Friday, 15 April 2011
Tuesday, 12 April 2011
Monday, 11 April 2011
Evaluation outline
Thursday, 7 April 2011
Ancillary Texts


Friday, 1 April 2011
Thursday, 31 March 2011
Final Video


Tuesday, 29 March 2011
Final Cut
 +
+
We decided to use Final Cut for our media production, on the shots which can be seen here. We decided to layer these shots, so that we had one ontop of the other; however this proved to be very difficult and ended up changing our whole production by compressing the shots and becoming slightly closer. This meant that our establishing shot now had half of the writing cut off. However, after speaking with Mike we realised that the writing at the start of music videos is not a convention of music videos, but instead the broadcaster's individual input - therefore we decided that it does not actually matter whether the writing is cut off, and as it was too late to delete the writing completely, we had to keep it on. However, we did manage to layer the two shots, after realising that it was in fact easier than we had first anticipated, all we had to do was right click the shot and click "overlay". Therefore we have now managed to layer our shots, and our production is completely finished - along with ancillary texts.

Thursday, 24 March 2011
Poster & Digipack
Our Digipack proved to be much more difficult, as it would not work on publisher, so we had to use Microsoft Word, somehow we managed to pull it off without reducing the quality of the pictures, and we included the conventions such as including the executive producer (and other companies involved with the production of our video, digipack and poster) in small font on the reverse side of the digipack. We also made sure we included a barcode on our digipack, to create a sense of verisimilitude.
Overall we were very impressed with our ancillary products as we had to improvise with the programming due to our audience feedback and the most popular fonts. We were not expecting such a good result from the Microsoft programmes, and these will be uploaded very soon.
Sunday, 6 March 2011
February
Tuesday, 18 January 2011
Editing
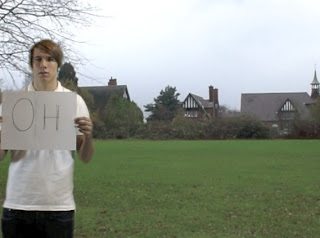
After we had done this we saved it, and opened it up within the same project, which meant that we could put a new green screen shot over the top. So it now looked like this:
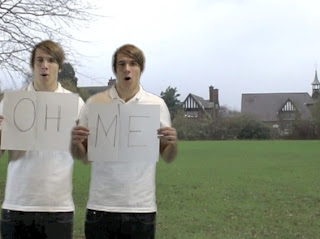
We then repeated the previous step until we had the four males so th
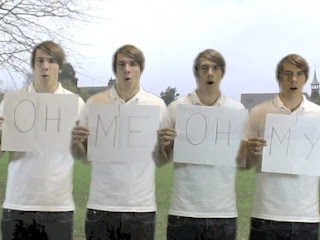 ey gradually added onto the end. Our final shot looked like this:
Overall we were very happy with how this turned out, as we were unsure as to how the final result would look. We edited the contrast and brightness of the shots because his jeans change slightly (which can be seen in the above screen grab) so now our shots looked very realistic and it is almost impossible to tell that we have used the greenscreen effect. The final result can be seen on our final video when everything has finished being edited.
Thursday, 13 January 2011
13/01/11
Wednesday, 12 January 2011
Lighting experiment
When we were filming our green screen shots, we decided that we should experiment with lighting as we were unsure as to which ways would cause more shadows, or more lighting on the actual screen rather than the male. During this video you can see that we had used the same background (which will also be the background for our final piece as the sky is very dull and negative - creating a negative feel to the male) for all of the shots, but we have used different shots in which the male exits the shot via the left which will also feature in our production. We decided after looking at these one after another on this video that if we do not use the overhead lighting, then the two side lights appear stronger and affect the whole shot - resulting in too much light being attracted to the sides of the green screen and making the purpose of the green screen effect less effective. Therefore we decided we must use the overhead lighting to stop this effect happening. When looking at the two side lights, we tried different positions of the lighting. For example, if you look at the image you can see that there were 2 different positions for each side camera. We mixed these combinations and tried them all to see which one was most effective. For example, we used the Side Lighting A at point 1 whilst Side Lighting B was at point 1 also, we then changed it so that Side Lighting A stayed at point 1, but Side Lighting B was now at point 2. We then did the opposite of this, so there was a total of 4 combinations when regarding the side lighting. We decided on putting Side Lighting A at point 1 and Side Lighting B at point 2 as we found that it did not create a shadow when the male exited the shot and it also meant that the male did not look too discoloured from the 'Oh me, Oh my' shots either. There was also the issue that with too much  lighting on the shots, the male sometimes turned translucent and we could see through his arms and shoulders. We then decided to mess around with effects on the Mac and we lowered the contrast levels which effected our short green screen lighting experiment as he was no longer translucent, and the colours were much more vivid. Therefore we believe that this experiment was extremely beneficial as it meant that we could get the best out of our green screen shots and it enabled us to use the green screen effect extremely effectively.
 shots so that only part of the green screen shot is shown. For example, looking at the screen grab you can see that by moving the four circular points you can cut out the parts that you do not want. For example, (referring back to our original green screen experiment) we had the top corner which had shadows and did not 'green screen' well. However, we now have the ability to cut these errors out of our production, therefore if a part of the shot has not worked as well as we had hoped and the male doesn't go near that section we can cut it out and make it disappear.